
I completed a project that turned our pretty well. I thought I would share the details as a blog and maybe stir up other’s creativity. I will look to add additional projects that I complete. This was done as a gift, not a business venture – enjoy the details and let me know if I should capture other of my “up-configured” projects.
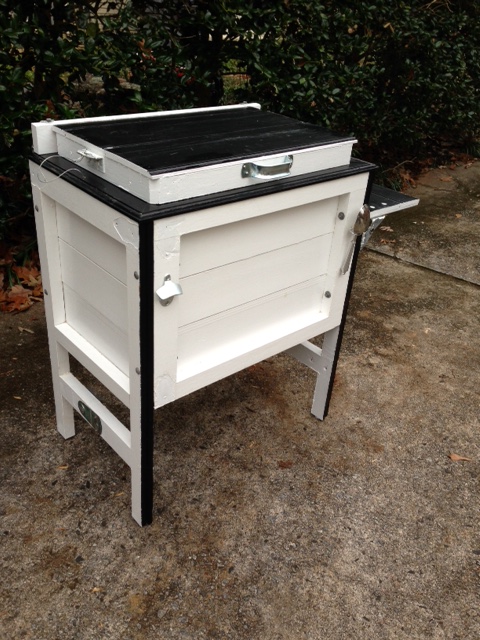
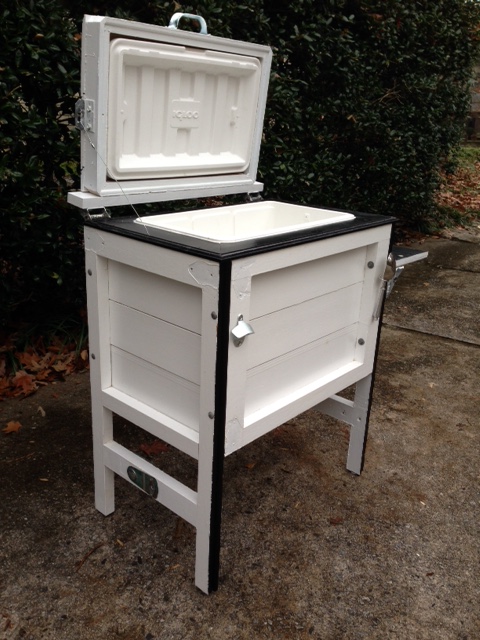
This is the completed project – somewhat different from my initial vision. But lets go back a bit. I saw a cooler embedded into a wooden case and wanted to make one for my parents for Christmas. On a Saturday morning I headed out to buy a cooler and salvage some pallets to use for construction as seen on multiple blogs and http://www.homerepairtutor.com. The project was on!
Two dumpsters later I found a pallet that was semi-buried under a bunch of construction debris – I pushed these long panels out of that way and wedged the prize pallet out – it was nasty, broken and crooked. I was about to move on until I noticed that the four long panels that I was pushing out of the way were sections of a garage door – and in great shape. Lesson one – don’t get too focused on the raw materials you seek when doing a salvage project! These are 100% better raw materials – and painted to boot.

The first task was to do a rough estimate of the materials needed. I had only three door panels. Measuring the width of the cooler, I estimated that I could use two of the 1/4 paneled section horizontally as the front and back and other sections of the frame could be reconfigured vertically to make the sides.
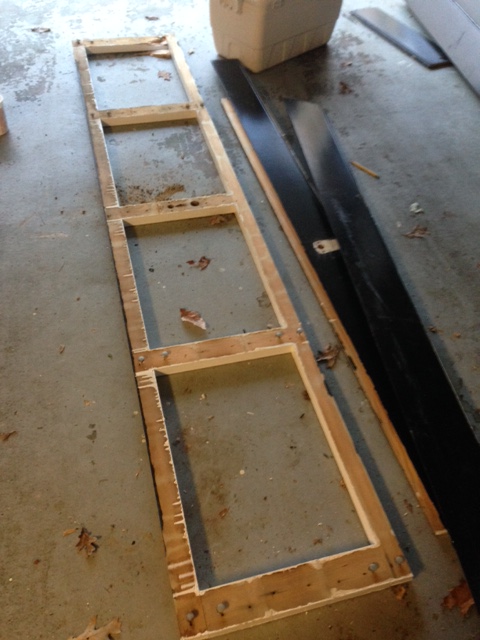
I used my circular saw cutoff jig to make equal side panels measuring in from the end to 34 inches – There are no dimensions in this blog because you need to make it work with the raw materials that you can find. It needs to be about kitchen counter height.

This is the cut off frame for the side panel. The garage door has fancy mortises holding the cross pieces in place – perfect!

To make the side panels match the front, the paneling has to be added back on horizontally. This paneling must be cut to give clearance for the front and back panel to be inset and bolted – more on that later.
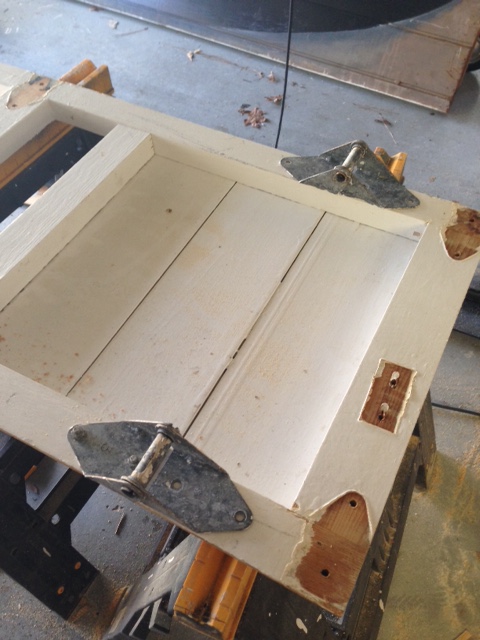
Once I got started I felt a sense of challenge to use as much of the salvaged material as possible. I used the door hinges to support the side table. These had to be attached before the sides were bolted to the front and back as I reused the blind carriage bolts that are inserted from the inside.
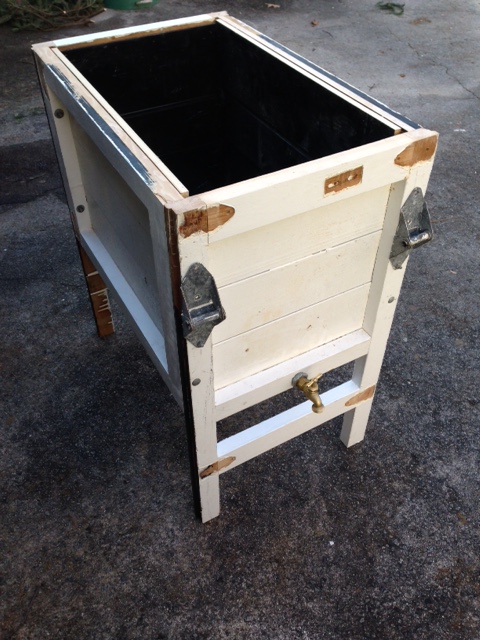
And heck – while I had a flat panel that is easy to set on sawhorses – I added some plumbing. This cooler is not something you tip over to empty, so a drain is a definite must!

Here is where I get a little over the top. I liked the look of the spigot that you see above better than the type that has a screw in collar that would be much better suited to attach to a wooden cross member like this. Aesthetics is sometimes a curse I have. So – I found a galvanized threaded fitting that has nice big threads on it. I screwed that into a hole drilled into the wood. Unfortunately that leaves nothing to hook a hose onto. So, I fished around and found a stub fitting that you see here. I ground the threads off a bit and brazed it to the inside of the spigot threaded section. It passes through the galvanized fitting and sticks out through the wood cross-member where I attached a hose via a hose clamp.
I now had four panels that need some sort of joinery to hold them together. I thought of many different options to overlap leg supports – but the thickness of the material here lent itself to simply bolting. Lesson 2 – adjust your construction to your materials.

Easy to see – hard to drill – here is a helpful method. There are 8- 4 1/2 inch galvanized carriage bolts that go through the side panels and into the frame of the front and back panels.

Eight bolts later and wow it looks like a cooler stand! Note the carriage bolt heads on the side panel. You can see how the cabinet front and back are inset within the side panels. Earlier I mentioned the side paneling – the paneling that is nailed onto the inside of the side piece must be short enough so that the front and back panels can fit inset as shown here.
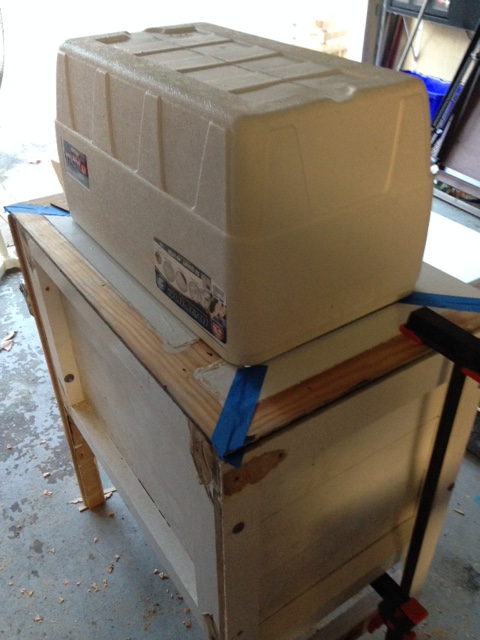
So this is a big empty box that won’t hold a cooler yet. It needs a rim for the cooler, a base for the cooler to stand on, and a lid.
For the rim, I had just enough long pieces of the garage door paneling left and they are tongue and groove so the edge is decorative. I cut 4 pieces with 45 degree angles into a square frame. I made sure the opening was slightly smaller than the cooler. I used painters-tape to temporarily hold them together and flipped them to cut the opening with a jigsaw. (It is a neater cut from the bottom with the jigsaw since the blade is pulled to cut)

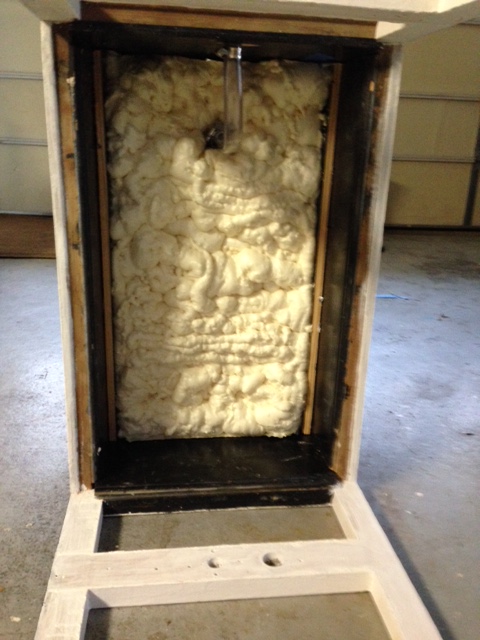
This Igloo cooler is pretty basic – thin walls and the top is not even insulated. To make it perform better I took advantage of the extra space and covered the cooler with expanding foam insulation. I caulked the cooler into the top rim first so that the expanded foam would not show. I also taped aluminum foil to the sides so that the foam would not seep through the cracks of the panels of the sides. Overkill you say? guilty. Lesson 3 – have a deadline or you will keep coming up with cool additions to your project and never finish- wait, I could add a light that comes on when you open the cooler…..

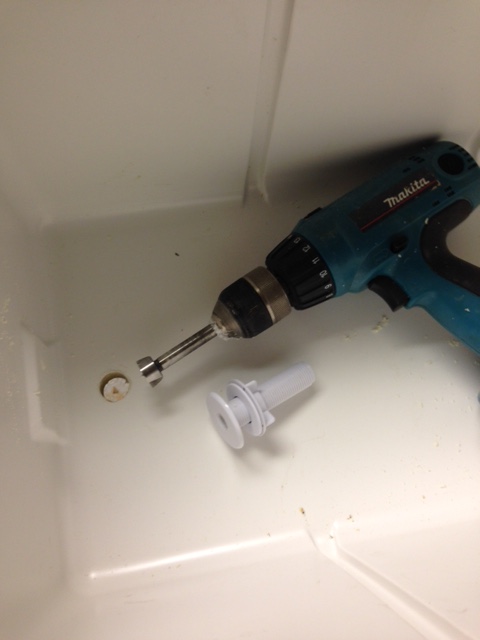
A few cans of Great stuff later and it will be super insulated. The cooler I used did not have a drain on the side so I drilled through the bottom. Tip – you can used a sink hole cap found at Lowes and drill out the top to make a drain. Attach a hose from this drain and to the spigot and you are all set.
Back to the top. I assembled a couple more garage door panel scraps into a lid. It is deep enough for the cooler lid with a bit of room to spare. I closed the plastic lid, rested the wood lid in place and then put four long screws into the lid from the side – making sure they didn’t penetrate to the inside of the lid.

And that is it. Some paint added to protect the wood and touch up the look and it is ready for summer parties. I added handles, feet, an ice scoop, a bottle opener and added back the garage lock mechanism on the side leg panel just for looks. Not shown very well, but as you can imagine, the lid hinges are garage hinges. The lid limiter is a bicycle cable with an aluminium swage fitting pressed on.
More than you wanted to know, I am sure, but hey it was a fun project. Total bill of materials was something like this:
- 2 – 9 foot wooden garage panels – free! (1 is left over for the next project)
- 1 cooler
- 1 brass hose spigot
- 1 threaded stub
- 1 galvanized reduction fitting
- 1 1 foot vinyl tube
- 2 hose clamps
- 1 garage door handle (no handle on the original door)
- 4 cans Great Stuff
- 1 bottle opener (Amazon)
- 1 Ice scoop
- 1 long screw eye
- 8 4 1/2″ Galvanized bolts
- 4 adjustable feet
- 4 long screws to hold lid
- Nail gun staples
- Bicycle brake cable and aluminum swage
Here are a few additional shots:


One thought on “A cooler stand from a salvaged garage door”